sabato 30 luglio 2016

Tatting: how to work with three shuttles (part 1) - Chiacchierino: come lavorare con tre navette - (parte 1)

Reading the title of this post you are wondering if it is really possible to work using three shuttles.
The answer is yes, working with three shuttles is possible.
Only thing we need, in addition to another shuttle, is some more patience, because handling three shuttles requires more attention than working with two.
However I ensure you that the effort will be rewarded by the result.  

By working with three shuttles we have the opportunity to combine colours and tatting shapes in many different manners, following the inspiration of the moment; at every change made, the motif, although classic and traditional in design and structure, will always appear new and unexpected.
Do not you think this is an intriguing possibility?

In this post, I'll show you an example how to use three shuttles, but I'm sure that your creativity will propose you more and more unique and lovely combinations to create spectacular works.

The motifs made with three shuttles can be worked in a different way depending on the pattern we want make, or the result we want to obtain.
The first type of work that I will show you, can be called "mirror working": the work performed on one side of the central thread is a mirror image of the one made on the opposite side. 

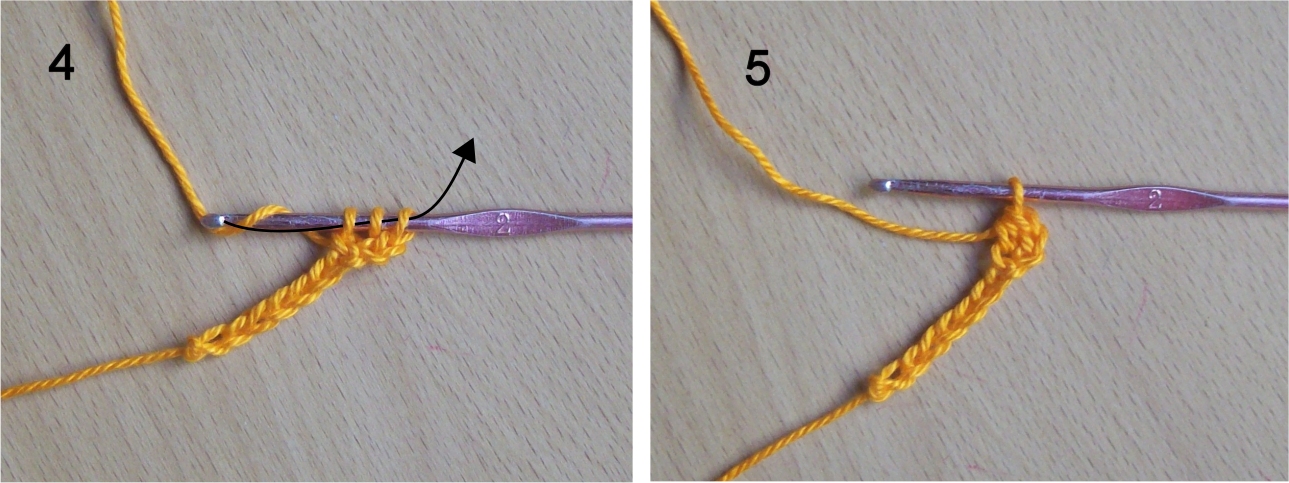
First of all wind the tatting shuttles and tie the ends. Mirror working is very easy to make: the central shuttle is held in the right hand and performs all the movements for the construction of the knots, the other two shuttles are used alternately with the left hand, just as when we work an usual chain.

Here is the steps to work this motif:
- with green colour, make a chain of 1ds, reverse work and change the shuttle;
- with red colour, make a chain of 1ds, reverse work again and take the shuttle with green thread;
- make a chain of 1ds, leaving thread to create a picot, reverse work and make the same thing with the red thread.
Repeat these steps three times.
Continue to work at the same way, increasing from 1 to 2 ds. Notice how the picots get bigger. Repeat these steps three more times.
Increase from 2 to 3 ds and repeat the steps three times again.
Continue to work decreasing the number of knots from 3 to 2 before, then from 2 to 1.
The result will be: a chain of knots with picots on both sides.


Leggendo il titolo di questo post vi starete chiedendo se è davvero possibile lavorare con tre navette.
La risposta è si, lavorare con tre navette è possibile.
L'unica cosa di cui abbiamo bisogno, oltre ad una navetta in più, è un pizzico di pazienza: sì, perchè maneggiare tre navette richiede più attenzione di quanto non ne sia necessaria lavorando con due. Vi assicuro però, che lo sforzo sarà ripagato dal risultato.

Lavorando con tre navette abbiamo la possibilità di combinare i colori con le forme del chiacchierino in maniera sempre diversa, seguendo l'ispirazione del momento; ad ogni cambiamento operato, il motivo, anche se classico e tradizionale nel disegno e nella struttura, risulterà sempre nuovo e inaspettato.
Non trovate che questa sia un'opportunità davvero intrigante?

In questo post, vi mostrerò un esempio di come possomo essere utilizzate tre navette, ma sono certa che la vostra fantasia vi suggerirà combinazioni sempre più uniche e deliziose per creare lavori spettacolari.

I motivi con tre navette possono essere lavorati in modo diverso a seconda del modello che vogliamo realizzare, o del risultato che desideriamo ottenere. La prima lavorazione che vi mostrerò può essere definita "lavorazione a specchio": il lavoro eseguito su un lato del filo portanodi è speculare rispetto a quello eseguito sul lato opposto.

Prima di tutto avvolgete il filo nelle navette e annodate le estremità. La lavorazione a specchio è molto semplice: la navetta centrale è tenuta nella mano destra ed esegue tutti i movimenti per la costruzione dei nodini, le altre due navette sono utilizzate alternativamente con la mano sinistra, proprio come avviene per la lavorazione di un arco.

Ecco i vari passaggi per lavorare questo motivo:
- con il colore verde, lavorate un arco di 1nd, voltate il lavoro e cambiate navetta;
- con il colore rosso, lavorate un arco di 1nd, voltate nuovamente il lavoro e riprendete la navetta con il verde;
- lavorate un arco di 1nd, lasciando il filo per creare un picot, voltate il lavoro e fate lo stesso con il colore rosso.
Ripetete questi passaggi tre volte.
Continuate a lavorare allo stesso modo, aumentando a due il numero dei nodini. Notate come i picot diventano più grandi. Ripetete questi passaggi altre tre volte.
Aumentate a 3nd e ripetete i passaggi sempre tre volte.
Infine continuate a lavorare scalando il numero dei nodini, prima a due e poi a uno.
Il risultato sarà: una catena di nodini con picot su entrambi i lati.


giovedì 28 luglio 2016

Tatting: how to make an inverted picot - Chiacchierino: come fare un picot rovesciato

An inverted picot is a picot upside down, in other words it develops toward the inside of the ring or chain that we are working and not to the outside as we usually see.
Who works tatting knows that the presence of the picot has the crucial role of allowing the union of the different parts that form the lace: therefore the picot is useful.
Then someone could ask: why make a picot flipped that, especially when enclosed within a ring, can not be used as a connecting point?
The answer is simple.
The picot is also an ornamental element to great effect: so, the picot is also nice not only useful and its unusual placement can impart a touch of individuality to our work.
Let us see how to make it.
Make a ring, with the required number of ds (I made 10ds - 1ip - 10ds), then work only the second part of the ds leaving the space like a picot, work another ds in order to fasten the stitches, then with the help of a crochet hook, slide the picot so that it flips. Continue to work and, finally, close the ring.
Here is the inverted picot.

Un picot rovesciato è un picot capovolto, vale a dire che si sviluppa verso l'interno dell'anello o dell'arco che stiamo lavorando e non verso l'esterno come siamo abituati a vedere.
Chi lavora il chiacchierino sa che la presenza del picot ha il fondamentale ruolo di consentire l'unione delle diverse parti che costituiscono il pizzo: perciò il picot è utile.
Allora qualcuno protrebbe chiedersi: per quale motivo lavorare un picot capovolto che, specie se racchiuso all'interno di un anello, non può essere usato coome punto di congiunzione?
La risposta è semplice.
Il picot è anche un elemento ornamentale di grande effetto: perciò il picot è anche bello non soltanto utile, ed una sua inconsueta collocazione può conferire un tocco di particolarità ai nostri lavori.
Vediamo allora come realizzarlo.
Lavorate un anello normalmente, con il numero di nd richiesto (io ho fatto 10nd - 1pr - 10nd), poi lavorate solo la seconda parte del nd lasciando un po' di filo come se fosse un picot, lavorate un nd per assicurare il lavoro, quindi con l'ausilio di un uncinetto, fate scorrere il picot in modo che si capovolga. Continuate nella lavorarione dei nd e, infirne, chiudete l'anello.
Ecco il picot rovesciato.


mercoledì 27 luglio 2016

Tatting: how to make heart shaped rings - Chiacchierino: come fare anelli a forma di cuore

To give a romantic heart shape to the normal tatting rings, we need just a picot.
Make a ring of 7ds - 1p - 5ds - 1p - 5ds, join to the last p, 5ds - 1p - 7ds. Close. Leave a section of thread and make again a ring of 7ds, join to the p of the previous ring, 5ds - 1p - 5ds, join to the last p, 5ds - 1p - 7ds. Close.
To make sure you do not spoil the shape of the heart, close your rings slowly, holding them between thumb and forefinger.
In this example, I used single shuttle, so I leave a section of thread to make the second ring in a straight line, but, if you want, can make a chain from a ring to another, working in this case, with two shuttles.
You can also increase the number of ds worked and get bigger hearts, or working the joining p between the rings after 2 or 3 nd: in this way you will get a circular pattern like a shamrock or four-leaf clover. 

Per dare una romantica forma a cuore a dei normali anelli lavorati a chiacchierino, occorre semplicemente un picot.
Lavorate un anello di 7nd - 1p - 5nd - 1p - 5nd, att. all'ultimo p, 5nd - 1p - 7nd. Ch. Lasciate un tratto di filo e lavorate nuovamente un anello di 7nd, att. al p dell'anello precedente, 5nd - 1p - 5nd, att. all'ultimo p, 5nd - 1p - 7nd. Ch.
Per essere certi di non rovinare l'effetto a cuore, chiudete gli anelli lentamente tenendoli tra il pollice e l'indice.
Nell'esempio che vedete, io ho utilizzato una sola navetta perciò ho lasciato un po' di filo per lavorare il secondo anello in linea retta, ma, se lo preferite, potete fare un arco tra un anello e l'altro lavorando in questo caso con due navette.
Potete anche aumentare il numero di nd lavorati ed ottenere cuori più grandi, oppure lavorare il p d'unione tra gli anelli dopo aver fatto 2 o 3 nd: in questo modo potrete ottenere un motivo circolare come un trifoglio o un quadrifoglio.


lunedì 25 luglio 2016

Tatting: how to make Josephine Knot - Chiacchierino: come fare il Nodo Giuseppina

Josephine knot (JK) is a beautiful type of tatting elements. It's an ornament very easy to make: indeed, how you can see in this photo it is not other that a small ring made with only the first part, or only the second part, of the double stitches (usually, I use the first part). It is generally written in the pattern instructions with the number of stitches followed by the abbreviation s (stitch) or ss (single stitch). Can be inserted between two rings as in this example, or between two chains as in the case of the pattern that I designed to make a flower by slightly pointed petals and that you can find by clicking here. Also it can be used to decorate the chains in place of normal picots and to be made with a variable number of stitches, as long as each ring is small in size. Unlike picots, the JK can not serve as a connecting element because it is completely closed, so if you need to connect a ring or chain, you can work two JK and use the space between them to perform the joining (see photo). In my example, each of two JK is made with 3n and, in addition to allowing the join of a ring or chain, is a bridge element between two rings.

Il Nodo Giuseppina (NG) è un elemento ornamentale del chiacchierino molto bello e veramente facile da realizzare: come potete vedere in questa foto, non è altro che un piccolo anello fatto utilizzando solamente la prima parte, o solamente la seconda parte, del nodino doppio (di solito, io utilizzo la prima parte). Generalmente viene indicato nelle istruzioni con il numero di nodi seguito dall'abbreviazione n (nodino). Può essere inserito tra due anelli come in questo esempio, o tra due archi come nel caso dello schema che ho disegnato per realizzare un fiore dai petali leggermente appuntiti e che potere trovare cliccando qui. Può, inoltre, essere utlizzato per decorare gli archi al posto dei normali picot ed essere fatto con un numero variabile di nodi, purchè ogni anello risulti di piccole dimensioni. Al contrario dei picot non può fungere da elemento d'unione perchè è completamente chiuso, perciò se avete la necessità di agganciarvi un anello o un arco, potete lavorare due NG e usare lo spazio tra di loro per eseguire l'unione (vedi foto). Nel mio esempio ciascuno dei due NG è di 3n e, oltre a permettere l'unione di un anello o un arco, fungono da ponte tra i due anelli.

The first part of double stitches (or the second part) can also be used to make a normal chain worked with two shuttles. In this case the effect will be very beautiful because the segment made with this type of stitch will begin to twist. In order to obtain the same result that you can see in this photo, make 10s at least, then push the stitches back: this action will allow to the segment just worked to twist. Repeat up to reach the desired length.

La prima parte del nodino doppio può anche essere usata per fare un normale arco lavorato con due navette. In questo caso l'effetto sarà molto bello perchè il segmento realizzato con questo tipo di punto tenderà a girare. Al fine di ottenere lo stesso risultato che vedete nella foto, lavorate almeno 10n, dopodiché spingete indietro i nodini: questa azione permetterà al segmento appena lavorato di girare. Ripetete fino a raggiungere la lunghezza desiderata.

venerdì 22 luglio 2016

Crochet: how to make triple (or treble) crochet - Uncinetto: come fare la maglia altissima

Triple (or treble) crochet (photo 1) is made at the same way of double crochet, but with one more yarn over hook at the beginnig of its performance. It appears in the pattern instructions with the abbreviation tr (or trc). To make a triple crochet wrap your yarn over the hook two times, then insert hook into one of basic stitches. If you work on chain stitches as in the following example, insert the crochet hook into the fifth chain counting back from the hook, because those four chain stitches count as the first triple crochet (photo 2). Yarn over hook and pull it up through basic stitch (photo 3): so you have four loops over hook. Yarn over hook again, pull it up through two of the loops on your hook (photo 4). 

La maglia altissima (foto 1) si lavora come la maglia alta, ma con un gettatto in più sull'uncinetto all'inizio della sua esecuzione. Viene indicata nelle istruzioni con l'abbreviazione m.ass., ma poichè viene anche chiamata doppia maglia alta, la potete ritrovare con l'abbreviazione dm.a. Per lavorare una maglia altissima gettate il filo sull'uncinetto due volte e puntatelo nella maglia di base. Se state lavorando su una serie di catenelle, come nell'esempio che segue, puntate l'uncinetto nella quinta catenella perchè le prime quattro sostituiscono la prima maglia altissima (foto 2). Gettate il filo sull'uncinetto e ritiratelo attraverso la maglia di base (foto 3): avrete così quattro maglie sull'uncinetto. Gettate il filo sull'uncinetto ancora una volta e ritiratelo in modo da chiudere le prime due maglie (foto 4).


 Now you have three loops. Yarn over hook and pull it up through other two loops (photo 5), yarn over hook again and close the last two loops (photo 6), now you have a triple crochet (photo 7).

Adesso sono rimaste tre maglie sull'uncinetto. Gettate il filo sull'uncinetto e chiudete le altre due maglie (foto 5), di nuovo il filo sull'uncinetto per chiudere le ultime due maglie (foto 6), ed ecco la maglia altissima (foto 7).
 

giovedì 21 luglio 2016

Crochet: how to make double crochet - Uncinetto: come fare la maglia alta

Double crochet (photo 1) is the most used stitch, toghether chain, of all crochet basic stitches. It is written in the pattern instructions with the abbreviation dc. To make this stitch wrap the yarn over the hook before to insert it into one of basic stitches. If you work on chain stitches as in the following example, insert the crochet hook into the fourth chain counting back from the hook, because those three chain stitches replace the first double crochet (photo 2). Yarn over hook again and pull it up through basic stitch (photo 3): so you have three loops over hook. Now yarn over hook and pull it up through the first two loops over hook (photo 4); yarn over hook again and pull it up through the last two loops over hook (photo 5), in order to close the stitches and to obtain a double crochet (photo 6).

La maglia alta (foto 1) è, tra i punti base dell'uncinetto, la più utilizzata insieme alla catenella. La trovate indicata nelle istruzioni con l'abbreviazione m.a. Per lavorare una maglia alta, gettate il filo sull'uncinetto e puntate l'uncinetto nella maglia di base. Lavorando su una serie di catenelle, come nell'esempio che segue, puntate l'uncinetto nella quarta catenella perchè le prime tre sostituiscono la prima maglia alta (foto 2). Gettate nuovamente il filo sull'uncinetto e ritiratelo attraverso la maglia di base (foto 3): vi ritroverete in questo modo tre maglie sull'uncinetto. Adesso gettate il filo sull'uncinetto ed estraetelo attraverso le prime due maglie (foto 4); gettate ancora una volta il filo sull'uncinetto ed estraetelo attraverso le ultime due maglie (foto 5), chiudendo il punto per ottenere la maglia alta (foto 6).


mercoledì 20 luglio 2016

Crochet: how to make half double crochet - Uncinetto: come fare la mezza maglia alta

Half double crochet (photo 1) is written in the pattern instructions with the abbreviation hdc. To make this stitch wrap the yarn over the hook before to insert it into one of basic stitches. If you work on chain stitches as in the following example, insert the crochet hook into the thrid chain counting back from the hook, because the first two chain stitches replace the first half double crochet (photo 2). Yarn over hook again and pull it up through basic stitch (photo 3), so you have three loops over hook; now hook the yarn and pull it up through all three loops over hook (photo 4). You have made an half double crochet (photo 5).

La mezza maglia alta (foto 1) viene indicata nelle istruzioni con l'abbreviazione mezza m.a. o m.m.a. Si lavora gettando il filo sull'uncinetto prima di inserirlo in una delle maglie di base. Se lavorate su una serie di catenelle come nell'esempio che segue, puntate l'uncinetto nella terza catenella contando dall'uncinetto, perchè le prime due catenelle sostituiscono la prima mezza maglia alta (foto 2). Gettatte di nuovo il filo sull'uncinetto ed estraetelo facendolo passare attraverso la maglia di base (foto 3), avrete così tre maglie sull'uncinetto; adesso gettate ancora il filo sull'uninetto ed estraetelo attraverso le tre maglie (foto 4). Avrete formato una mezza maglia alta (foto 5).


martedì 19 luglio 2016

Crochet: how to make single crochet - Uncinetto: come fare la maglia bassa

To make a single crochet (abbreviation sc), insert hook into one of basic stitches, then hook the yarn of the ball and pull it up through the first loop so that you have two loops over hook (photo 1). Yarn over hook again, pull it up through both loops in order to have a single crochet (photos 2, 3). 

La maglia bassa (abbreviazione m.b.) si lavora puntando l'uncinetto nella maglia di base, dopodiché agganciate il filo del gomitolo ed estraetelo attraverso il punto di base, in modo da ottenere due maglie sull'uncinetto (foto 1). Agganciate di nuovo il filo del gomitolo e passatelo attraverso le due maglie chiudendo così il punto (foto 2, 3).


Crochet: how to make slip stitch - Uncinetto: come fare la maglia bassissima

Slip stitch is also used to fasten yarn off with hook and as closing when you work in the round. It appears on pattern instructions with abbreviation sl st.
To make a slip stitch, insert hook from front to back into one of basic stitches, yarn over hook and pull it up through basic stitch and loop over hook (photo 1). You have made a slip stitch (photo 2).
Repeat for each basic stitch to obtain the stitches desired (photos 3, 4).

La maglia bassissima è molto usata per le rifiniture e come chiusura nelle lavorazioni in tondo; nelle istruzioni viene indicata con l'abbreviazione m.bss.
Per fare una maglia bassissima puntate l'uncinetto in una maglia di base, agganciate il filo del gomitolo ed estraetelo facendolo passare attraverso la maglia di base e la maglia sull'uncinetto (foto 1). In questo modo avrete una maglia bassissima (foto 2). Ripetete per ogni maglia di base per ottenere il numero di maglie bassissime desiderato (foto 3, 4).


Crochet: how to make Chain stitch - Uncinetto: come fare la Catenella

Crochet is an ancient process of creating fabric by basic stitches very easy to make: chain, slip stitch, single crochet, half double crochet, double crochet, triple (or treble) crochet.
The different variations made on these stitches and their creative combination give life to small and big spells that we find in the most complex and imaginative patterns.

L'uncinetto è un'antica tecnica di lavorazione composta da punti base molto semplici da eseguire: catenella, maglia bassissima, maglia bassa, mezza maglia alta, maglia alta, maglia altissima.
Le diverse varianti operate su questi punti e la loro creativa combinazione danno vita a quelle piccole e grandi magie che ritroviamo nei lavori più complessi e fantasiosi.

How to get started.
To start working, make a loop with the yarn of the ball, insert the crochet hook and hook the yarn, pull it up loop (photo 1). Pull the free end down (photo 2), you will get a slip knot. Finally, pull the yarn of the ball down to tighten the slip knot (photo 3). Remember not to count this knot when you work.

Come iniziare.
Per iniziare a lavorare, formate un anello con il filo del gomitolo, inserite l'uncinetto e agganciate il filo, tirate facendolo passare attraverso l'anello iniziale (foto 1). Tirate l'estremità verso il basso (foto 2), otterrete un cappio. Infine tirate il filo del gomitolo (foto 3) per stringere il cappio e avere così la prima maglia. Ricordate di non contare questa maglia nella lavorazione.


Chain stitch.
Chain is the first basic stitch of crochet. It appears on pattern instructions with abbreviation Ch.
After making the slip knot, hook the yarn of the ball again (this is called a yarn over), pull it up through the slip knot over the hook (photo 1), you have made one chain stitch (photo 2). Continue in the same way up to reach the desired number of chain stitches. (photos 3, 4, 5).

Catenella.
Il primo dei punti base dell'uncinetto è la catenella che nelle istruzioni dei modelli compare con l'abbreviazione cat.
Dopo aver lavorato la prima maglia, agganciate nuovamente il filo del gomitolo e fatelo passare attraverso la maglia che si trova sull'uncinetto (foto 1), avrete la prima catenella (foto 2). Proseguite allo stesso modo fino a raggiungere il numero di catenelle desiderato. (foto 3, 4, 5).