Perhaps the hemstitch is the easiest stitch to finish a hem.
Despite the practical use of this stitch, it can also be used for decorative purposes:
some threads of fabric are tied together making a row of small openings more or less large, and these bunches of threads can then be further arranged and embellished.
Previously we had saw how to make edges and corners, and preparing linen fabric to work the hemstitch. Now we see the steps to obtain a perfect edge finished with the hemstitch.
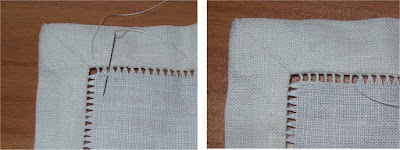
In the following photos we can see how to begin our work.
This stitch goes from left to right on the back of the work; first of all we need to secure the threads cut so we start from the corner with very close stitches.
Il punto a giorno è forse la lavorazione più semplice per rifinire un orlo.
Sebbene la sua valenza sia principalmente pratica, può anche essere impiegato a scopo decorativo:
alcuni fili di tessuto vengono legati insieme formando un fila di piccole aperture più o meno grandi, e questi mazzetti possono essere diversamente disposti e ulteriormente arricchiti.
Precedentemente abbiamo visto come fare orli ed angoli, e preparare il lino per l'esecuzione di questo punto, adesso vediamo i vari passaggi per ottenere un perfetto orlo rifinito con il punto a giorno.
Nelle foto che seguono vediamo come iniziare a lavorare.
Si procede da sinistra a destra sul retro del lavoro, prima di tutto dobbiamo fissare i fili tagliati e perciò si inizia dall'angolo con punti molto fitti.
Then we start grouping some trheads of fabric (in this example I took five threads). The needle passes behind the threads and out to the front. Pull the needle so that the working thread wraps around the threads of the fabric, then take two threads of the folded edge. Position the needle for the next stitch and repeat these steps.
Poi iniziamo raggruppando alcuni fili di tessuto (in questo esempio ne ho preso cinque). Passate l'ago dietro i fili facendolo uscire sul davanti. Estraete l'ago in modo che il suo filo avvolga i fili del tessuto, quindi fissate il punto prendendo due fili dell'orlo ripiegato. Posizionate di nuovo l'ago per il punto successivo e ripetete questi passaggi.
We have worked the first row of the hemstitch.
Abbiamo lavorato la prima fila dell'orlo a giorno.
Finished the first row of the hemstitch, start the second row.
Turn the work so that the bunches are positioned upside down and begin from the corner again.
Pass the needle into the fabric to secure the working thread inside some stitches and work the hemstitch as before.
Terminata la prima fila iniziamo a lavorare la seconda.
Girate il lavoro in modo che i mazzetti siano posizionati al contrario e iniziate sempre dall'angolo.
Passate l'ago nel tesstuo per fissare il filo all'interno dei primi punti ed eseguite l'orlo a giorno come descritto precedentemente.
This is the hemstitch on the right of the work.
Questo è l'orlo a giorno sul diritto del lavoro.
As you have seen the execution of the hemstitch is very simple and I hope you enjoy it.
Soon I'll show you some of the many variations that can be made and that too alone are real ornaments.
Come avete visto l'esecuzione del punto a giorno è molto semplice e spero vi piaccia.
Presto vi mostrerò alcune delle innumerevoli varianti che si possono realizzare e che anche da sole costituiscono dei veri e propri ornamenti.


Nessun commento:
Posta un commento